- ガイダンス
- 開発環境 変換用の元画像
- 画像の読み込み
- 拡大
- 縮小
- 最近傍補間 (Nearest neighbor)
- 双一次補間 (Bilinear)

from PIL import Image

def load_image(image_path):
  try:
    img = Image.open(image_path)
    print(f"Successfully loaded image: {image_path}")
    print(f"Image size: {img.size}")
    print(f"Image mode: {img.mode}")
    return img
  except Exception as e:
    print(f"Error loading image: {e}")
    return None

if __name__ == "__main__":
  image_path = "source.png"
  img = load_image(image_path)
from PIL import Image

def load_image(image_path, scale_factor=2):
  try:
    img = Image.open(image_path)

    new_width = int(img.size[0] * scale_factor)
    new_height = int(img.size[1] * scale_factor)

    img_resized = img.resize((new_width, new_height), Image.Resampling.LANCZOS)
    print(f"Successfully loaded and resized image: {image_path}")
    print(f"Original size: {img.size}")
    print(f"New size: {img_resized.size}")
    print(f"Image mode: {img_resized.mode}")

    img_resized.save("magnified_" + image_path)
    return img_resized
  except Exception as e:
    print(f"Error loading image: {e}")
    return None

if __name__ == "__main__":
  image_path = "source.png"
  img = load_image(image_path)

from PIL import Image

def load_image(image_path, scale_factor=0.5):
  try:
    img = Image.open(image_path)

    new_width = int(img.size[0] * scale_factor)
    new_height = int(img.size[1] * scale_factor)

    img_resized = img.resize((new_width, new_height), Image.Resampling.LANCZOS)
    print(f"Successfully loaded and resized image: {image_path}")
    print(f"Original size: {img.size}")
    print(f"New size: {img_resized.size}")
    print(f"Image mode: {img_resized.mode}")

    img_resized.save("reduced_" + image_path)
    return img_resized
  except Exception as e:
    print(f"Error loading image: {e}")
    return None

if __name__ == "__main__":
  image_path = "source.png"
  img = load_image(image_path)

from PIL import Image


def load_image(image_path, scale_factor=2):
  try:
    img = Image.open(image_path)

    new_width = int(img.size[0] * scale_factor)
    new_height = int(img.size[1] * scale_factor)

    img_resized = img.resize((new_width, new_height), Image.Resampling.NEAREST)
    print(f"Successfully loaded and resized image: {image_path}")
    print(f"Original size: {img.size}")
    print(f"New size: {img_resized.size}")
    print(f"Image mode: {img_resized.mode}")

    img_resized.save("magnified_nearest_" + image_path)
    return img_resized
  except Exception as e:
    print(f"Error loading image: {e}")
    return None


if __name__ == "__main__":
  image_path = "source.png"
  img = load_image(image_path)

from PIL import Image


def load_image(image_path, scale_factor=2):
  try:
    img = Image.open(image_path)

    new_width = int(img.size[0] * scale_factor)
    new_height = int(img.size[1] * scale_factor)

    img_resized = img.resize((new_width, new_height),
                             Image.Resampling.BILINEAR)
    print(f"Successfully loaded and resized image: {image_path}")
    print(f"Original size: {img.size}")
    print(f"New size: {img_resized.size}")
    print(f"Image mode: {img_resized.mode}")

    img_resized.save("magnified_bilinear_" + image_path)
    return img_resized
  except Exception as e:
    print(f"Error loading image: {e}")
    return None


if __name__ == "__main__":
  image_path = "source.png"
  img = load_image(image_path)
最近傍補間 (Nearest neighbor)
たとえば出力画像の左からi番目、上からj番目のピクセルに対応する元画像の点は、(特別な場合を除けば)どのピクセルにも対応しない半端な点になる。「元画像の左から1.7番目、上から1.8番目」のようなピクセルは存在しないので、なんらかの工夫が必要になる。

元画像でこの対応点にもっとも近いピクセルの色を出力画像のピクセルの色として採用する。つまり、出力画像の求めたいピクセルに対応する元画像の座標 が、例えば下の図のように(16.8, 24.3)だった場合に、この周りの4つのピクセルのうち、最も近い(17, 24)のピクセルの色を使う方法である。使う座標は単純に対応点の座標をそれぞれ四捨五入するだけで求められる。

たとえば出力画像の左からi番目、上からj番目のピクセルに対応する元画像の点は、(特別な場合を除けば)どのピクセルにも対応しない半端な点になる。「元画像の左から1.7番目、上から1.8番目」のようなピクセルは存在しないので、なんらかの工夫が必要になる。
元画像でこの対応点にもっとも近いピクセルの色を出力画像のピクセルの色として採用する。つまり、出力画像の求めたいピクセルに対応する元画像の座標 が、例えば下の図のように(16.8, 24.3)だった場合に、この周りの4つのピクセルのうち、最も近い(17, 24)のピクセルの色を使う方法である。使う座標は単純に対応点の座標をそれぞれ四捨五入するだけで求められる。
双一次補間 (Bilinear)
最近傍補間で画像を拡大すると、拡大率が大きいときはジャギーが目立ってしまう。
対応点を囲むピクセルの色の情報を組み合わせて使うと、出力側の色の変化をもっと滑らかにできる。その際に、対応点を囲む4つのピクセルからの縦横の距離に応じて重みを付ける。
例えば対応点の座標が (16.7, 24.3) の場合は図のような配置になる。
この場合はその点に近い右上の点の影響が大きく、遠い位置にある左上、左下、右下の点の影響はそれよりも小さくなるようにしたい。

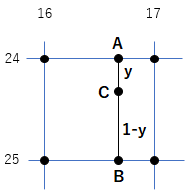
これを一般的に考えるため、下の図のように対応点の位置を変数 x, y (いずれも0以上1未満) で表わす。

まず、左上と右上のピクセルの色を混ぜて点Aの色、左下と右下のピクセルの色を混ぜて点Bの色を決める。
どちらも左右の色を「1-x : x」の比で混ぜる。
「点Aの色」 = (1-x)「左上の色」 + x「右上の色」
「点Bの色」 = (1-x)「左下の色」 + x「右下の色」
(xが0ならA, Bの色は左側の点と同じになり、xが1なら右側の点と同じになる)

さらに、点Aと点Bのピクセルの色を混ぜて点Cの色を決める。
この場合は上下の色を「1-y : y」で混ぜる。
「点Cの色」 = (1-y)「点Aの色」 + y「点Bの色」
(yが0ならCの色は点Aと同じになり、yが1なら点Bと同じになる)
つまり、このピクセルの色は
(1-y){(1-x)(左上の色) + x(右上の色)} + y{(1-x)(左下の色) + x(右下の色)}
となる。
最近傍補間で画像を拡大すると、拡大率が大きいときはジャギーが目立ってしまう。
対応点を囲むピクセルの色の情報を組み合わせて使うと、出力側の色の変化をもっと滑らかにできる。その際に、対応点を囲む4つのピクセルからの縦横の距離に応じて重みを付ける。
例えば対応点の座標が (16.7, 24.3) の場合は図のような配置になる。
この場合はその点に近い右上の点の影響が大きく、遠い位置にある左上、左下、右下の点の影響はそれよりも小さくなるようにしたい。
これを一般的に考えるため、下の図のように対応点の位置を変数 x, y (いずれも0以上1未満) で表わす。
まず、左上と右上のピクセルの色を混ぜて点Aの色、左下と右下のピクセルの色を混ぜて点Bの色を決める。
どちらも左右の色を「1-x : x」の比で混ぜる。
「点Aの色」 = (1-x)「左上の色」 + x「右上の色」
「点Bの色」 = (1-x)「左下の色」 + x「右下の色」
(xが0ならA, Bの色は左側の点と同じになり、xが1なら右側の点と同じになる)
さらに、点Aと点Bのピクセルの色を混ぜて点Cの色を決める。
この場合は上下の色を「1-y : y」で混ぜる。
「点Cの色」 = (1-y)「点Aの色」 + y「点Bの色」
(yが0ならCの色は点Aと同じになり、yが1なら点Bと同じになる)
つまり、このピクセルの色は
(1-y){(1-x)(左上の色) + x(右上の色)} + y{(1-x)(左下の色) + x(右下の色)}
となる。